
Oct 20, 2015 Networking, DigitalOcean, High Availability, Load Balancing
Introduction
A DigitalOcean Floating IP is a publicly-accessible static IP address that can be assigned to one of your Droplets. A Floating IP can also be instantly remapped, via the DigitalOcean Control Panel or API, to one of your other Droplets in the same datacenter. This instant remapping capability grants you the ability to design and create High Availability (HA) server infrastructures—setups that do not have a single point of failure—by adding redundancy to the entry point, or gateway, to your servers. Achieving a complete HA setup also requires redundancy at every layer of your infrastructure, such as your application and database servers, which is often difficult to implement but can prove to be invaluable for reducing downtime and maintaining a happy user base.
Note that assigning a Floating IP to a Droplet will not replace the Droplet's original public IP address, which will remain unchanged. Instead, a Floating IP will provide an additional static IP address that can be used to access the Droplet it is currently assigned to.
This tutorial will cover the following topics:
- A Basic High Availability Setup
- How To Manage DigitalOcean Floating IPs
- Droplet Anchor IPs
- Floating IP Metadata
- How To Implement an HA Setup
- Other Floating IP Use Cases
Let's look at a basic HA setup example to get started.
A Basic High Availability Setup
The easiest way to learn about how an HA server setup works, if you are not familiar, is to look at a very basic one. The most basic HA server setup consists of a Floating IP that points to a set of, minimally, two load balancers in an active/passive configuration. This acts as the gateway layer of your server setup, which your users will access to get to your web servers.
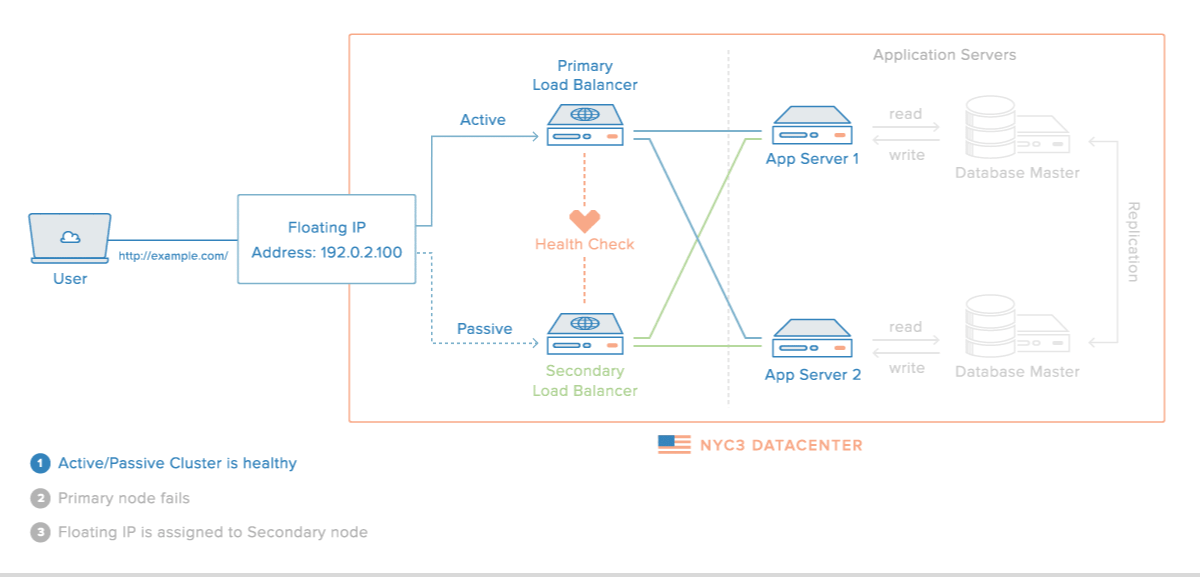
Here is a description of each component in the diagram:
- Active Server: The server that receives user traffic that is forwarded from the Floating IP. Typically, this is a load balancer that forwards the traffic to a backend of web application servers
- Passive Server: A standby server that is usually configured identically to the active server. It only will receive traffic during a failover event—i.e. if the active server becomes unavailable, and the Floating IP is remapped to the standby server
- Floating IP: The IP address that points to one of the servers, and can be remapped in the event of the failure of the active server
It is important to note that the Floating IP does not automatically provide high availability by itself; afailover mechanism, which automates the process of detecting failures of the active server and reassigning the Floating IP to the passive server, must be devised and implemented for the setup to be considered highly available. Assuming that an effective failover strategy has been implemented, the above setup allows for the service to be available even if one of the servers fail.
There are several different ways to approach failover, which we will look at later, but let's look at how to use DigitalOcean Floating IPs next.
How To Manage DigitalOcean Floating IPs
As with most DigitalOcean resources, Floating IPs can be managed via the Control Panel or API. While the Control Panel allows you to create, reassign, and destroy Floating IPs, utilizing the API is necessary for implementing an effective automatic failover mechanism. We'll look at both methods for managing Floating IPs, starting with the Control Panel.
Control Panel
To manage your Floating IPs via the DigitalOcean Control Panel, click on the Networking link (top navigation menu), then Floating IPs in the left menu. The first time you visit the page, you will see a page that you have no Floating IPs but you can create one:

Here, you can create a Floating IP by selecting one of your Droplets and clicking the Assign Floating IPbutton. If you want to acquire a Floating IP without assigning it to a Droplet immediately, you can simply select a particular datacenter from the list.
Note: If you assign a Floating IP to a Droplet that was created before October 20, 2015, you will be presented with a modal message that will include instructions that must be followed before a Floating IP can be assigned to that Droplet. This will create an anchor IP on your Droplet, which we will discuss later in this tutorial.
After a few moments, you will have a new Floating IP that points to the Droplet that you selected:
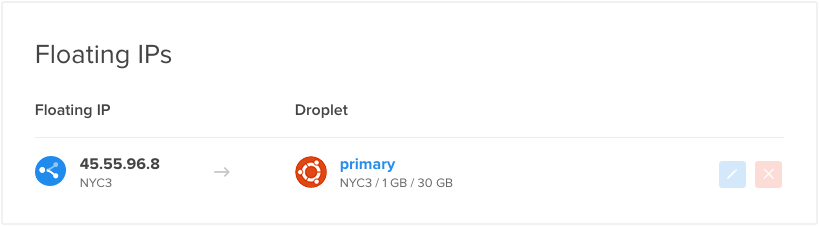
If you have at least one Floating IP, this page will display a list of your Floating IPs, which includes the following details about each entry:
- Address: The Floating IP address, which is how it can be accessed and also how it is internally identified
- Datacenter: The datacenter in which the Floating IP was created. A Floating IP can only be assigned to Droplets within the same datacenter
- Droplet: The Droplet that the Floating IP is assigned to. Requests sent to the Floating IP address will be directed to this Droplet. This can also be set to "Unassigned", which means the Floating IP is reserved but will not pass network traffic to any Droplet
In addition to the Floating IP information, this section also allows you to perform the following actions:
- Reassign (Blue Pen Button): Assign the Floating IP to a different Droplet, within the same datacenter. You may also unassign the Floating IP
- Delete (Red X Button): Release the Floating IP from your account

Now that you are familiar with managing Floating IPs through the Control Panel, let's take a look at using the API.
API
The DigitalOcean API allows you to perform all of the Floating IPs management actions that you can do through the Control Panel, except it allows you to programmatically make changes. This is particularly useful because an HA setup requires the ability to automate the reassignment of a Floating IP to other Droplets.
The API allows you to perform the following Floating IP actions:
- List Floating IPs
- Reserve a new Floating IP to a region
- Assign new Floating IP to a Droplet
- Reassign Floating IP to a Droplet
- Unassign Floating IP
- Delete Floating IP
If you aren't familiar with the DigitalOcean API yet, check out this tutorial: How To Use the DigitalOcean API v2. Full documentation of the DigitalOcean API, which covers Floating IPs, can be found here:DigitalOcean API Documentation.
Note: The official DigitalOcean API wrappers for Ruby (DropletKit) and Go (Go) have been updated with full Floating IP support.
We won't get into all of the details of managing your Floating IPs via the API but we'll show a quick example. Here's an example of using the
curl command to reassign an existing Floating IP to a Droplet:
- curl -X POST -H 'Content-Type: application/json' -H 'Authorization: Bearer your_api_token' -d '{ "type": "assign", "droplet_id": 5000 }' "https://api.digitalocean.com/v2/floating_ips/8.8.8.9/actions"
Assuming that you replaced the highlighted values with real values, such as your API token, the target Droplet ID, and the Floating IP address to reassign, this would point
8.8.8.9 (the Floating IP) to your Droplet with an ID of 5000.
Now that you are familiar with managing your Floating IPs with the Control Panel and API, let's take a look at how Floating IPs communicate with Droplets.
Droplet Anchor IPs
Network traffic between a Floating IP and a Droplet flows through an anchor IP, which is an IP address that is aliased to a Droplet's public network interface (
eth0). As such, a Droplet must have an anchor IP before a Floating IP can be assigned to it. Droplets created after October 20, 2015 will automatically have an anchor IP. If you have a Droplet that was created before this, you can add an anchor IP by following the instructions in the How to Enable Floating IPs on an Older Droplet tutorial.
An anchor IP is only accessible to the Droplet that it belongs to, and to a Floating IP that is assigned to the Droplet. The implication of this is that the anchor IP is where you should bind any public services that you want to make highly available through a Floating IP. For example, if you are using a Floating IP in an active/passive load balancer setup, you should bind your load balancer services to their respective Droplet anchor IPs so they can only be accessed via the Floating IP address. This will prevent your users from using the public IP addresses of your Droplets to bypass your Floating IP.
How To Retrieve Your Anchor IP
The easiest way to retrieve your Droplet's Anchor IP is to use the Droplet Metadata service. Anchor IP information, like any data stored in Metadata, can be retrieved by running basic
curl commands from the command line of a Droplet.
This command will retrieve the anchor IP address of a Droplet:
- curl -s http://169.254.169.254/metadata/v1/interfaces/public/0/anchor_ipv4/address
This command will retrieve the netmask of a Droplet's anchor IP:
- curl -s http://169.254.169.254/metadata/v1/interfaces/public/0/anchor_ipv4/netmask
This command will retrieve the gateway of a Droplet's anchor IP:
- curl -s http://169.254.169.254/metadata/v1/interfaces/public/0/anchor_ipv4/gateway
The other way to look up information about your Droplet's anchor IP is to use the
ip addr command:
- ip addr show eth0
The anchor IP (highlighted) will be under your normal public IP address information:
[secondary_output Example output:]
2: eth0:  mtu 1500 qdisc pfifo_fast state UP group default qlen 1000
    link/ether 04:01:7d:c2:a2:01 brd ff:ff:ff:ff:ff:ff
    inet 159.203.90.122/20 brd 159.203.95.255 scope global eth0
       valid_lft forever preferred_lft forever
    inet 10.17.0.47/16 scope global eth0
       valid_lft forever preferred_lft forever
    inet6 fe80::601:7dff:fec2:a201/64 scope link
       valid_lft forever preferred_lft forever
Floating IP Metadata
A Droplet can see if it has a Floating IP assigned to itself by using the Droplet Metadata service. If a Floating IP is assigned, the Droplet can also retrieve the address of the Floating IP. This information can be very useful when implementing an HA server setup.
Like any information stored in Metadata, these details can be retrieved by running basic
curl commands from the command line of a Droplet.
To see if a Droplet has a Floating IP assigned to itself, run this command:
- curl -s http://169.254.169.254/metadata/v1/floating_ip/ipv4/active
If a Floating IP is assigned to the Droplet, you may retrieve its address with this command:
- curl -s http://169.254.169.254/metadata/v1/floating_ip/ipv4/ip_address
Full documentation of Droplet Metadata can be found here.
How To Implement an HA Setup
Now that you are familiar with how DigitalOcean Floating IPs work, you are ready to start building your own high availability server setups. If you need help getting started, here are several tutorials that will walk you through the creation of various active/passive high availability setups. Each tutorial uses a different software solution to achieve HA, so feel free to choose the one that is the best fit for your needs.
Corosync and Pacemaker
Corosync and Pacemaker provide a cluster software package that can be used to create an effective HA setup. Corosync provides a messaging layer, which enables servers to communicate as a cluster, while Pacemaker provides the ability to control how the cluster behaves. This tutorial will demonstrate how you can use Corosync and Pacemaker with a Floating IP to create an active/passive HA server infrastructure on DigitalOcean: How To Create a High Availability Setup with Corosync, Pacemaker, and Floating IPs on Ubuntu 14.04
Keepalived
Keepalived is a service that can monitor servers or processes in order to implement high availability on your infrastructure. This guide uses the
keepalived daemon to monitor two web servers. The secondary server will take over the web traffic if the primary server experiences issues by automatically claiming ownership of a shared Floating IP address using the DigitalOcean API: How To Set Up Highly Available Web Servers with Keepalived and Floating IPs on Ubuntu 14.04Heartbeat
Heartbeat provides clustering functionality that can be used with Floating IPs to implement a basic active/passive high availability server setup. This setup is not recommended for production use, but it effectively demonstrates how a simple HA server setup can be achieved: How To Create a High Availability Setup with Heartbeat and Floating IPs on Ubuntu 14.04
Other Floating IP Use Cases
Another way to leverage Floating IPs is Blue-green deployment, a strategy for deploying and releasing software. It relies on maintaining two separate production-capable environments, nicknamed blue and green for ease of discussion. This guide, discusses how to use blue-green deployments on DigitalOcean to simplify the process of transitioning your users to a new version of your software: How To Use Blue-Green Deployments to Release Software Safely
Conclusion
You should now understand how DigitalOcean Floating IPs work, and how they can be used to create a high availability server infrastructure.
If you have any questions about Floating IPs or high availability, please leave them in the comments below!


No comments:
Post a Comment